For More Info!
Cloud Landing zone
CLOUD LANDING ZONE
Building a Secure and Scalable Azure Landing Zone: Best Practices and Insights
Table of Contents
An Azure landing zone is essentially a structured environment within your Azure cloud that adheres to a set of best practices.
It serves as the foundation for migrating, modernizing, and innovating your applications at scale. Think of it as a well-organized city built on strong principles, allowing for efficient management and growth.
1 - Microsoft Cloud Adoption Framework for Azure
The Microsoft Cloud Adoption Framework for Azure (CAF) is a structured approach provided by Microsoft to help organizations smoothly transition to and effectively use Azure cloud services.
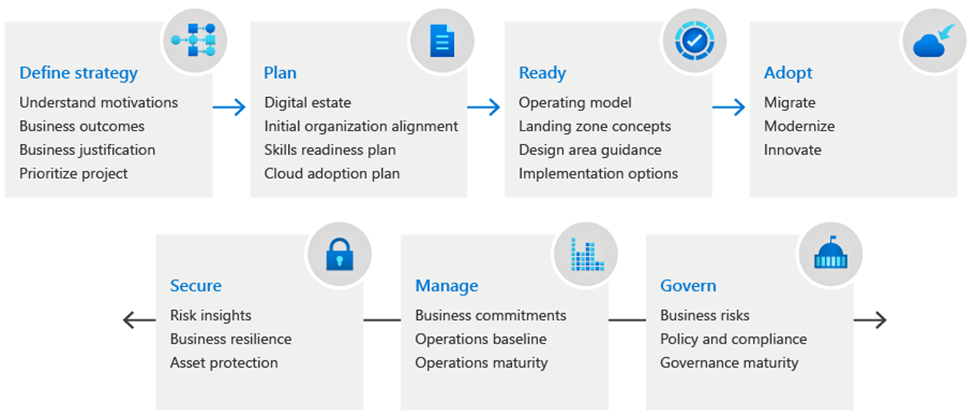
It covers strategy, governance, security, migration, and operations, offering guidance and best practices for each stage of the adoption process, To learn more about cloud apodtion framework Click Here
It helps businesses define their cloud strategy, plan their migration, establish governance, ensure security and compliance, and manage their cloud environment efficiently.
2 - Benefits of using Azure Landing Zone
Accelerated Cloud Adoption
Landing zones use pre-defined templates and a strong foundation to quickly establish a secure cloud environment, speeding up your cloud adoption
Security and Governance
Landing zones apply Azure Policy and RBAC to enforce security best practices, restricting access to authorized users and reducing vulnerabilities.
Optimized Costs
Through the strategic allocation of resources and the use of cost management tools within the landing zone architecture, cloud spending can be optimized.
Additional Benefits of Azure Landing Zones
Organization and Scalability: Landing zones provide a structured framework with subscriptions tailored for specific functions. This clear separation facilitates efficient resource management and seamless scalability as your cloud adoption progresses.
Flexibility and Automation: Landing zones can be tailored to fit specific requirements and are easily expandable or modifiable as needed. Moreover, Infrastructure as Code (IaC) practices can be adopted to automate the deployment and maintenance of landing zones, thereby streamlining the process..
3 - Comparing Landing Zone Types
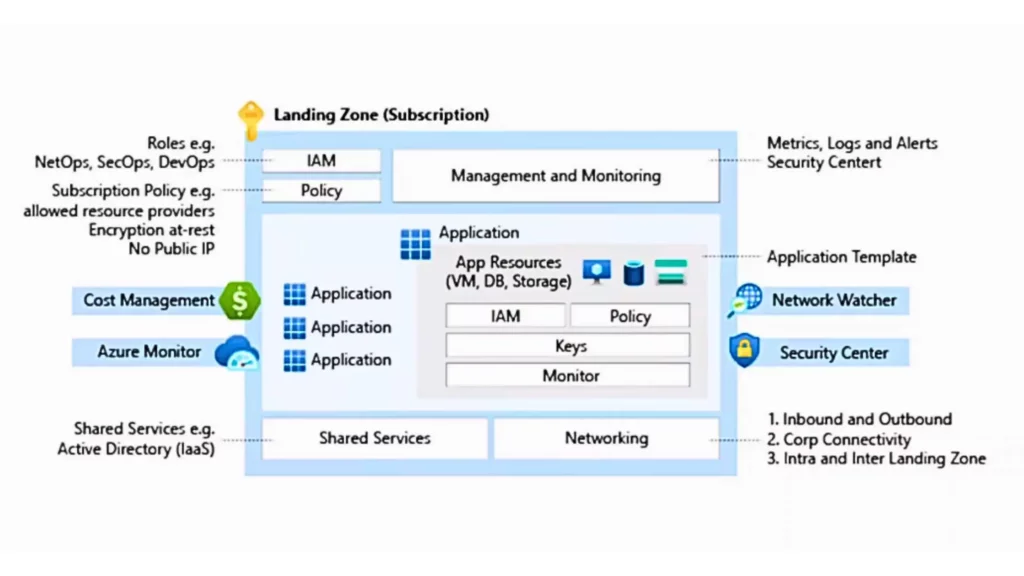
Azure Landing Zones offer different types based on the organization’s needs and maturity in cloud adoption.
Here’s a comparison of the two main types:
- Foundational Landing Zone
- Enterprise Landing Zone
3.1
Foundational Landing Zone
- Foundational Landing Zones provide a baseline environment with essential components for organizations new to Azure or starting their cloud journey. It focuses on establishing core infrastructure elements such as networking, identity, security, and management services.
Use Case
Ideal for organizations beginning their cloud adoption journey or those looking for a standardized, secure, and scalable environment to deploy workloads and applications in Azure.
- Features:
- Core networking setup (virtual networks, subnets)
- Basic identity and access management (Azure Active Directory)
- Fundamental security controls (network security groups, encryption)
- Basic resource management (provisioning, monitoring)
3.2
Enterprise Landing Zone
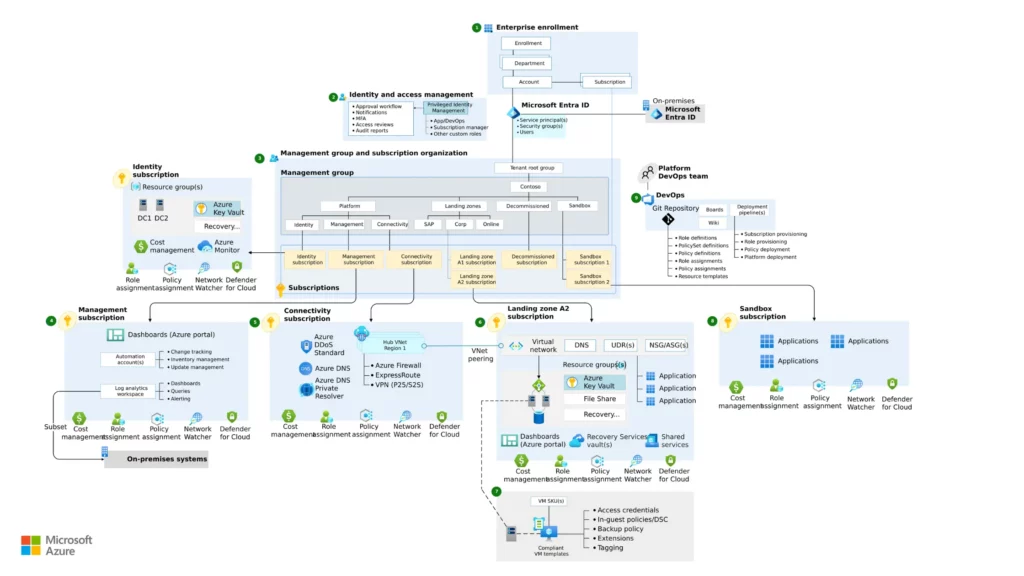
- Enterprise Landing Zones are more advanced and customizable environments tailored to meet specific organizational requirements, governance policies, and compliance standards. It provides additional features and capabilities for large enterprises or organizations with complex IT environments.
Use Case
Suited for large enterprises or organizations with specific regulatory compliance, security, or governance requirements. It offers flexibility and customization options to align with organizational standards and best practices.
- Features:
- Advanced networking configurations (multiple regions, hybrid connectivity)
- Enhanced identity and access management (role-based access control, multi-factor authentication)
- Robust security controls (advanced threat detection, data loss prevention)
- Comprehensive resource management (automation, policy enforcement, cost optimization)
4 - How Does an Azure Landing Zone Work?
Understanding Landing Zone Concepts
Here’s the magic behind Azure landing zones: five key design principles that ensure a secure, scalable, and well-governed cloud environment. Let’s explore each one.
Here Are Key Design Principles:
- Networking
- Identity Management
- Governance
- Security
- Management
Let’s break it down step-by-step:
4.1
Networking
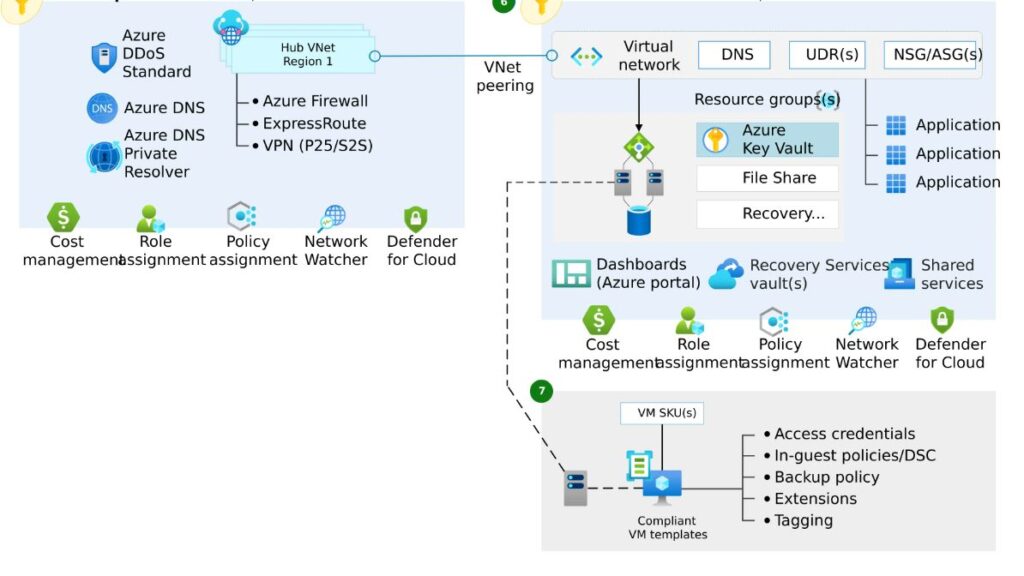
- Networking is a critical aspect of Azure infrastructure, providing the foundation for secure and efficient communication within your cloud environment.
The Key Components of Networking
- Virtual Networks (VNets): The foundation of your private network in Azure. VNets isolate your resources from the public internet and provide a secure environment for communication. You can define subnets within a VNet to further segment your network based on function or security needs.
- Subnet Design: Subnets act like sub-divisions within your VNet, allowing you to group resources with similar security requirements. For example, a separate subnet can be created for web servers, another for databases, and so on.
- Network Security Groups (NSGs): Firewall rules implemented at the subnet or VNet level to control inbound and outbound network traffic. NSGs act as security gates, allowing only authorized traffic to flow within your network.
Connectivity:
- ExpressRoute: Provides a dedicated private connection between your on-premises network and Azure datacenters. This option offers high bandwidth, low latency, and improved performance for workloads that require frequent communication with on-premises resources.
- VPN Gateways: Create a secure tunnel over the public internet to connect your on-premises network to Azure. VPNs are a cost-effective option for occasional or less bandwidth-intensive communication needs.
- Azure Peering: Allows you to directly peer your Azure VNets with other Azure services (e.g., Azure SQL Database) or other VNets within your subscription or across different subscriptions. Peering enables efficient communication without internet traffic overhead.
Traffic Management:
- Azure Traffic Manager: A load balancing service that distributes incoming traffic across multiple healthy instances of your application. This ensures high availability and scalability by routing traffic away from unavailable resources.
Security:
- NSGs: As mentioned earlier, NSGs provide granular control over network traffic flow. You can define rules to allow specific protocols and ports based on source and destination IP addresses.
- Azure Firewall: A managed firewall service offering advanced security features like centralized policy management, threat intelligence, and intrusion detection/prevention systems (IDS/IPS) for additional protection.
4.2
Identity Management
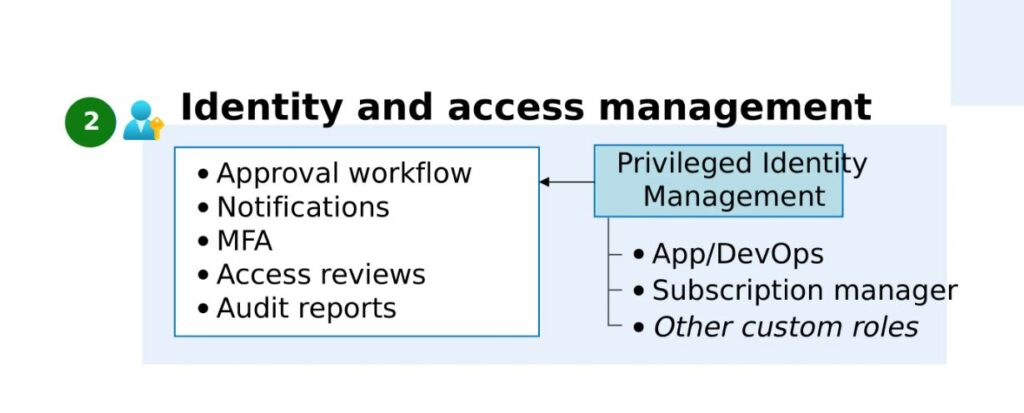
- Identity management in Azure ensures secure and efficient control over user access to your cloud resources.
Main Components of Identity Management
Azure Active Directory (AAD) Configuration:
- User Identities: Create user accounts in AAD for employees, partners, and external collaborators requiring access to Azure resources.
- Groups: Organize users into groups based on various criteria such as department, function, or project, making access management simpler. Assign permissions to resources at the group level for streamlined administration.
- Directory Synchronization: If you have an existing on-premises Active Directory, Azure AD Connect can synchronize user identities with AAD, providing users with a unified identity experience for accessing both on-premises and cloud resources through single sign-on (SSO).
Multi-factor Authentication (MFA):
- MFA Implementation: Enhance security by requiring an additional authentication layer beyond a username and password. MFA options include phone verification, security keys, or biometrics (e.g., fingerprint, facial recognition), preventing unauthorized access even when a password is compromised.
Conditional Access:
- Policy Enforcement: Define AAD policies to restrict access to Azure resources based on factors such as location, device type, or risk level. For example, require MFA for access attempts from outside the organization’s network or from unmanaged devices.
Application Access Control:
- Azure AD App Registrations: Register applications in AAD for user access, allowing you to define permission levels and specify the resources users can access and control within each application.
- Role-Based Access Control (RBAC): Establish roles in Azure corresponding to specific permissions for resources. Assign these roles to users or groups within AAD to grant them the necessary access for their tasks.
4.3
Governance
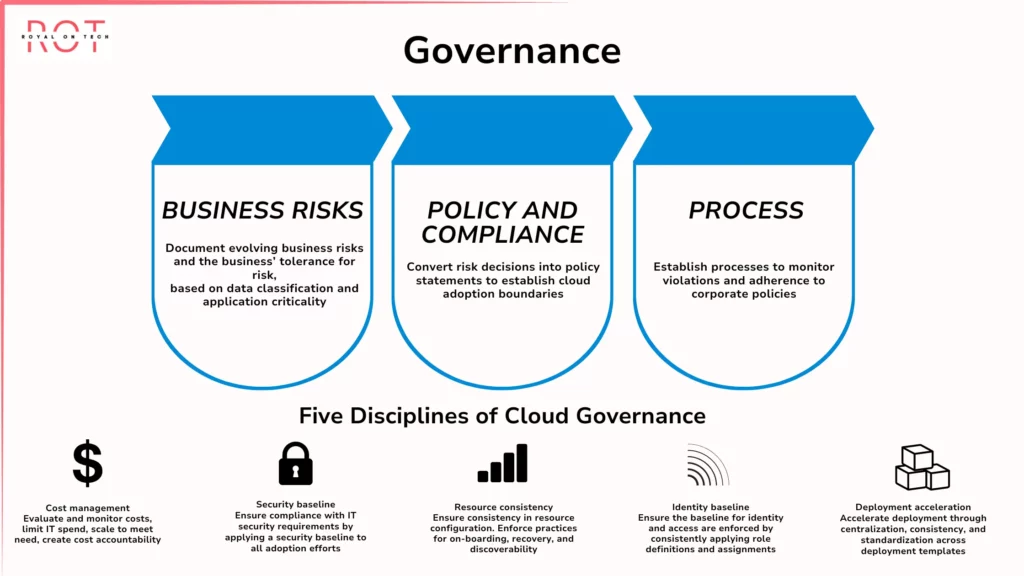
- Governance in Azure provides the framework for managing your cloud environment effectively while ensuring compliance and security.
Key Components of Governance
Azure Policy:
- Initiatives: Combine related policies to meet broader security or compliance standards, such as an “HIPAA Compliance Initiative” that includes policies for data encryption, access control, and audit logging.
- Definitions: Define specific policies that outline rules for resources. Examples include requiring strong passwords for VMs, limiting public access to storage accounts, and enforcing resource tags for cost tracking.
- Assignments: Apply policies or initiatives to resources such as subscriptions, resource groups, or management groups to enforce rules. This ensures consistent configurations and adherence to security best practices across your landing zone.
Management Groups:
- Logical Hierarchy: Organize Azure subscriptions into a hierarchy using Management Groups, allowing you to apply policies and governance rules at a higher level. Child subscriptions inherit these rules, streamlining governance and ensuring consistency throughout your Azure environment.
Compliance:
- Adherence to Standards: Align your landing zone with industry regulations (e.g., HIPAA, PCI DSS) or internal compliance requirements. This can include implementing policies for data encryption, access control, logging, and auditing to meet compliance mandates.
Resource Lifecycle Management:
- Resource Management: Establish processes for managing the entire lifecycle of Azure resources, including provisioning, configuration, tagging, and decommissioning. This ensures efficient resource creation and maintenance according to best practices throughout their lifespan.
4.4
Security
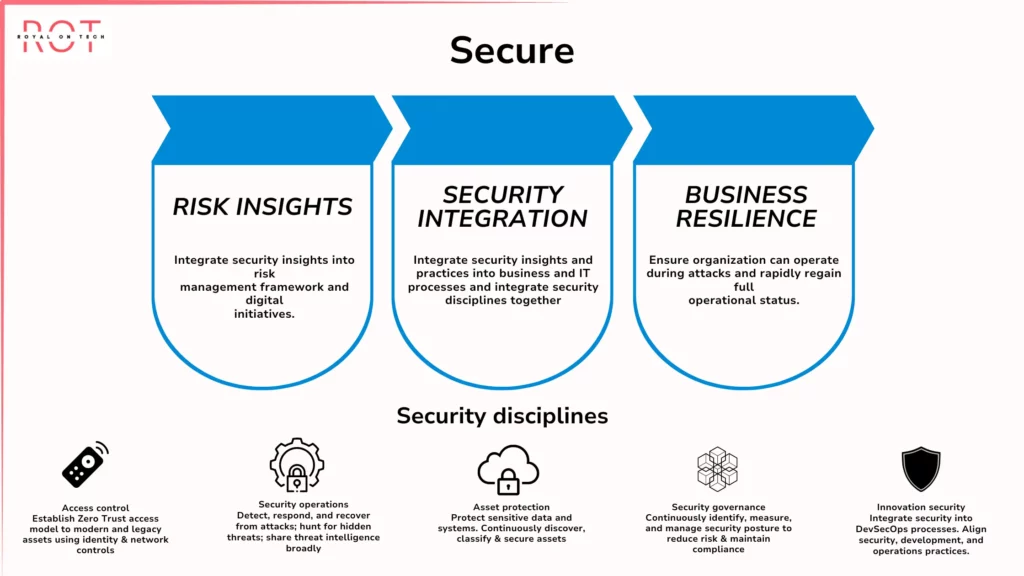
- Security in Azure is essential for protecting your cloud resources and data.
Key Components of Security Management
Identity and Access Management:
- Azure Role-Based Access Control (RBAC): Define roles with specific permissions for Azure resources. By assigning users or groups to these roles, you enforce the principle of least privilege, granting only the access required for users to perform their tasks and minimizing the risk of unauthorized actions.
Data Security:
- Encryption at Rest: Use Azure Storage Service Encryption (SSE) or Azure Disk Encryption for VMs to encrypt your data at rest. This ensures that even if an attacker gains access to your storage accounts or disks, they cannot read your data without the encryption key.
- Encryption in Transit: Protect data while it is being transferred between resources or between Azure and your on-premises environment using technologies like HTTPS or Azure Virtual Private Network (VPN). This safeguards your data from interception during transit.
- Azure Key Vault: Manage and control access to your encryption keys in a secure store. Centralized key management enhances security practices and prevents unauthorized access to encrypted data.
Network Security:
- Azure Firewall: Offers advanced threat protection features such as intrusion detection and prevention systems (IDS/IPS), monitoring network traffic for malicious activity, and automatically blocking suspicious attempts.
- Vulnerability Management: Regularly scan Azure resources for vulnerabilities using Azure Security Center or other scanning tools. Promptly patch vulnerabilities to prevent attackers from exploiting them.
- Security Monitoring: Leverage Azure Monitor to collect and analyze security-related data from your resources. This includes logs from Azure Security Center, NSGs, and other security services. Monitoring these logs helps you identify and address potential threats promptly.
4.5
Management
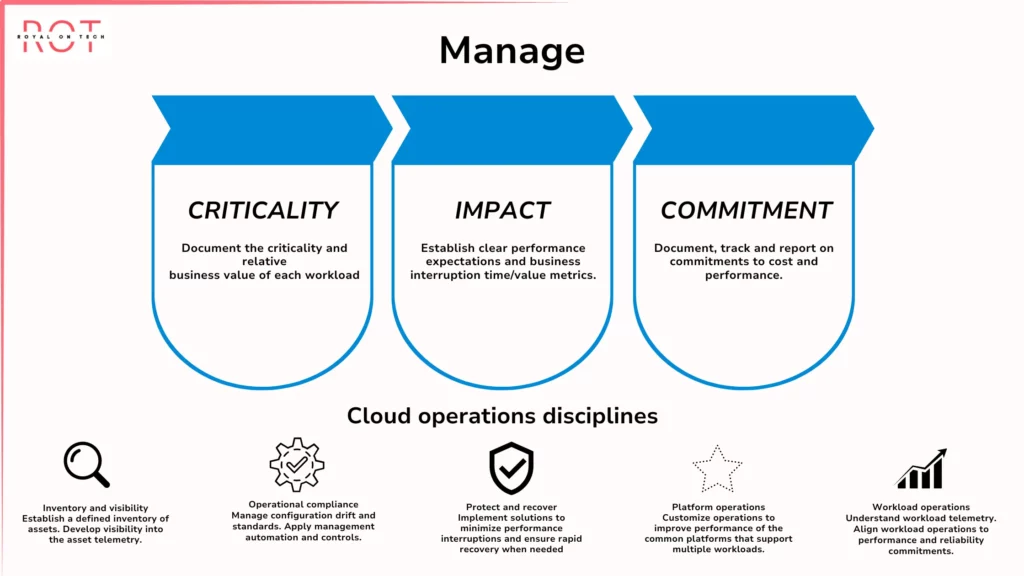
- Management in Azure encompasses the efficient organization, optimization, and protection of your cloud resources.
Key Aspects of Management
Resource Organization:
- Management Groups: Beyond hierarchical organization, Management Groups can be configured to restrict resource creation or specific service offerings within a group, enforcing governance rules and preventing accidental provisioning of unauthorized resources.
- Subscriptions: Subscriptions allow you to categorize resources based on their purpose, such as development, testing, and production environments.
Cost Management:
- Azure Cost Management Services: Utilize Azure Cost Management tools for tracking cloud spending through cost analysis reports, budgets, and reservations. This helps identify opportunities for optimization, such as addressing underutilized resources or unused services, to minimize cloud costs.
Automation:
- Azure Automation: Automate repetitive tasks for infrastructure provisioning, configuration management, and patching. Automation reduces manual effort, increases consistency, and minimizes human error.
- Third-Party Automation Tools: Integrate third-party automation tools like Ansible or Chef to manage Azure resources alongside on-premises infrastructure, enabling a unified automation strategy.
Monitoring and Alerting:
- Azure Monitor: Use Azure Monitor to set up alerts based on monitoring data, notifying you of potential issues or anomalies. Alerts can be triggered by specific metrics surpassing predefined thresholds or by detecting security events.
Backup and Disaster Recovery:
- Azure Backup: Back up Azure VMs, databases, and other resources to separate Azure storage, enabling data recovery in cases such as accidental deletion or hardware failure.
- Disaster Recovery Services: Utilize Azure Site Recovery and Azure Disaster Recovery to replicate on-premises infrastructure or Azure resources to a secondary location, allowing rapid restoration of critical applications and services in the event of a major outage at your primary location.
5 - How To Deployment (Multiple) Options Using Azure?
Certainly! Let’s break down the deployment options and evaluate them based on the context provided:
Azure Portal:
- Overview: Deploying Landing Zones using the Azure Portal involves manually configuring and provisioning resources within Azure through its web-based interface.
- Evaluation:
- Pros: Offers a straightforward approach for smaller deployments or those who prefer a more hands-on approach. Provides flexibility and control over configurations.
- Cons: Less automated and scalable compared to other methods. May be time-consuming and prone to human error for larger or more complex deployments.
Bicep:
- Overview: Bicep is a Domain Specific Language (DSL) for deploying Azure resources, providing a more concise and readable syntax compared to Azure Resource Manager (ARM) templates.
- Evaluation:
- Pros: Simplifies the creation and management of Azure resources. Offers a more efficient and streamlined approach compared to ARM templates. Allows for easier modularization and reuse of resource configurations.
- Cons: Requires familiarity with the Bicep language and may have a learning curve for those new to it. Limited tooling and ecosystem compared to Terraform.
Terraform:
- Overview: Terraform is an open-source infrastructure as code (IaC) tool that allows you to define, provision, and manage resources across multiple cloud providers, including Azure.
- Evaluation:
- Pros: Provides a consistent and repeatable way to provision Azure resources. Offers flexibility, scalability, and reliability for deploying and managing infrastructure. Has a large and active community with extensive documentation and support.
- Cons: May require additional setup and configuration compared to other options. Terraform’s HashiCorp Configuration Language (HCL) syntax may be less intuitive for some users.
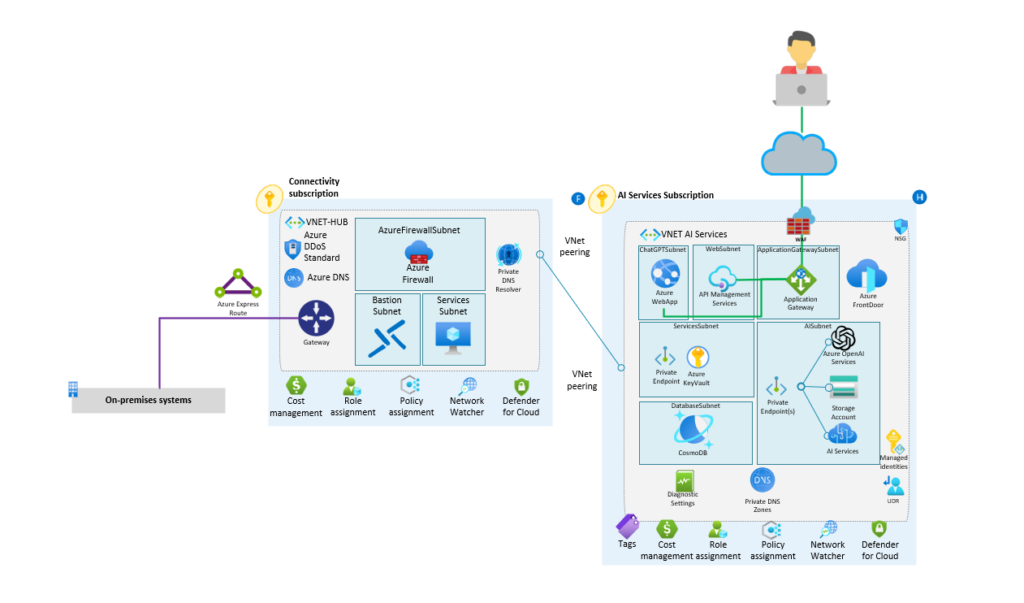
5.1
Deploying Landing Zones Using the Azure Portal
Deploying Landing Zones using the Azure Portal involves manually configuring and provisioning resources within Azure to establish the foundational infrastructure environment.
While this method may not be as automated or scalable as using Infrastructure as Code (IaC) tools like Azure Resource Manager (ARM) templates or Terraform, it provides a straightforward approach for smaller deployments or for those who prefer a more hands-on approach.
Here’s a general overview of the process:
1 - Prepare
Before you begin deploying resources in the Azure Portal, it's essential to have a clear understanding of your organization's requirements, including networking, identity, security, and compliance needs. Ensure that you have the necessary permissions and access to create resources within your Azure subscription.
2 - Sign in to the Azure Portal
Log in to the Azure Portal using your Azure account credentials.
3 - Create Resource Groups
Resource groups are logical containers that hold related Azure resources. Create one or more resource groups to organize the resources for your Landing Zone deployment. Navigate to "Resource groups" in the Azure Portal and click "Add" to create a new resource group.
4 - Deploy Networking Resources
Configure networking resources such as virtual networks (VNets), subnets, and network security groups (NSGs) to establish the network infrastructure for your Landing Zone. Navigate to "Virtual networks" in the Azure Portal to create a new VNet and associated subnets.
5 - Set Up Identity and Access Management (IAM)
Configure Azure Active Directory (AAD) for identity management, including user accounts, groups, and roles. Assign appropriate permissions and access controls to users and groups based on their roles within the organization. Navigate to "Azure Active Directory" in the Azure Portal to manage users, groups, and roles.
6 - Enable Security Controls
Implement security controls such as encryption, threat detection, and monitoring solutions to protect resources and data within your Landing Zone. Configure security settings for virtual machines, storage accounts, and other Azure services to ensure compliance with security best practices.
7 - Deploy Core Services
Deploy core services such as Azure Policy, Azure Monitor, and Azure Security Center to enforce governance, monitoring, and security controls across your Landing Zone. Navigate to the respective services in the Azure Portal to configure and enable these features.
8 - Monitor and Manage
Once your Landing Zone resources are deployed, monitor and manage them regularly to ensure they are functioning as expected. Use Azure Monitor and Azure Security Center to monitor resource performance, detect security threats, and remediate issues as needed.
Note
While deploying Landing Zones using the Azure Portal offers a more manual approach compared to using IaC tools, it provides flexibility and control over the configuration and provisioning of resources within your Azure environment.
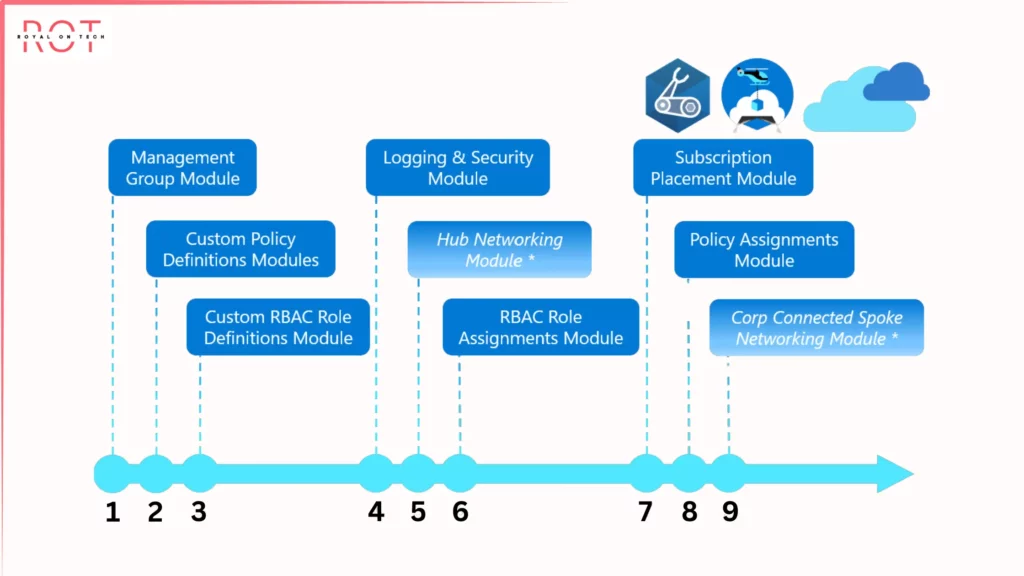
5.2
Deploying Landing Zones Using Bicep
Deploying Landing Zones using Bicep involves using Bicep, a Domain Specific Language (DSL) for deploying Azure resources, to define the infrastructure as code (IaC) templates. Bicep simplifies the creation and management of Azure resources by providing a more concise and readable syntax compared to Azure Resource Manager (ARM) templates.
Here’s a general overview of the process:
1 - Install the Bicep CLI
Before you can start using Bicep, you need to install the Bicep CLI. You can install it using package managers like npm (Node.js) or directly from GitHub releases.
2 - Write Bicep Templates
Use a text editor or an integrated development environment (IDE) to write Bicep templates that define the infrastructure components for your Landing Zone. Bicep files typically have a .bicep extension.
3 - Define Resources
In your Bicep templates, define the Azure resources needed for your Landing Zone deployment, such as virtual networks (VNets), subnets, network security groups (NSGs), storage accounts, and identity and access management (IAM) resources.
4 - Use Bicep Modules
Bicep supports modularization through the use of modules, which allow you to encapsulate and reuse resource definitions. You can define modules for common infrastructure patterns or components and reference them in your main Bicep templates.
5 - Declare Parameters and Variables
Declare parameters and variables in your Bicep templates to make them configurable and reusable across deployments. Parameters allow you to customize deployment settings, while variables enable you to simplify template logic and improve readability.
6 - Deploy with Bicep CLI
Use the Bicep CLI to build and deploy your Bicep templates to Azure. You can compile Bicep files into ARM templates using the bicep build command and deploy them using the Azure CLI or PowerShell.
7 - Monitor and Manage
Once your Landing Zone resources are deployed, monitor and manage them using Azure tools and services such as Azure Monitor and Azure Security Center. Set up alerts, dashboards, and automation to ensure the ongoing health, performance, and security of your infrastructure.
Note
Deploying Landing Zones using Bicep allows you to leverage the power of infrastructure as code to automate and streamline the deployment process. It provides a more efficient and consistent way to provision Azure resources, enabling you to deploy Landing Zones quickly and reliably while maintaining control and compliance.
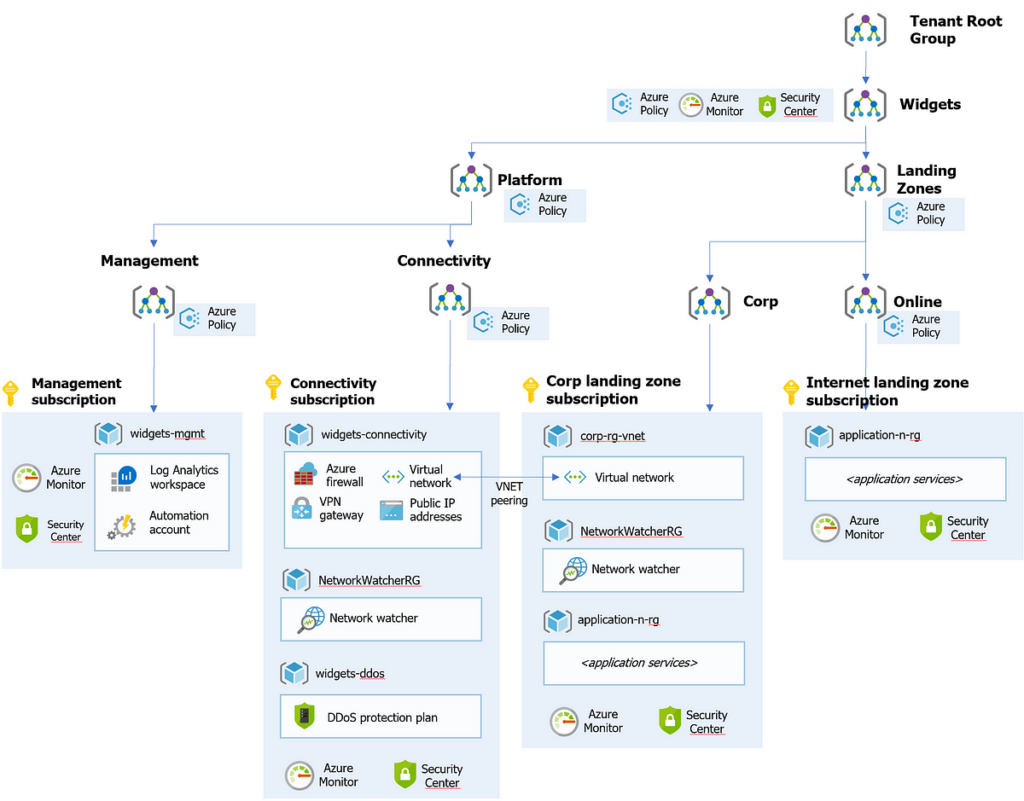
5.3
Deploying Landing Zones Using Terraform
Deploying Landing Zones using Terraform involves using Terraform, an open-source infrastructure as code (IaC) tool, to define, provision, and manage Azure resources. Terraform allows you to describe your infrastructure in a declarative configuration language and automate the deployment process.
Here’s a general overview of the process:
1 - Install Terraform
Before you can start using Terraform, you need to install the Terraform CLI on your local machine or build server. You can download Terraform from the official website or use a package manager like Homebrew (on macOS) or Chocolatey (on Windows).
2 - Write Terraform Configuration
Use a text editor or an integrated development environment (IDE) to write Terraform configuration files (usually with a .tf extension) that define the Azure resources for your Landing Zone. Terraform uses HashiCorp Configuration Language (HCL) syntax for defining infrastructure.
3 - Define Azure Provider
In your Terraform configuration files, specify the Azure provider to define the Azure subscription and authentication details. You'll need to provide your Azure subscription ID, tenant ID, and client ID/secret or use a service principal for authentication.
4 - Declare Resources
Define the Azure resources needed for your Landing Zone deployment, such as virtual networks (VNets), subnets, network security groups (NSGs), storage accounts, and identity and access management (IAM) resources. Use Terraform resource blocks to declare each resource type.
5 - Use Terraform Modules
Terraform supports modularization through the use of modules, which allow you to encapsulate and reuse resource configurations. You can define modules for common infrastructure patterns or components and reference them in your main Terraform configuration.
6 - Declare Variables and Inputs
Declare variables and inputs in your Terraform configuration files to make them configurable and reusable across deployments. Variables allow you to customize deployment settings, while inputs enable you to pass parameters to modules.
7 - Initialize and Apply
Use the Terraform CLI to initialize your Terraform project and apply your configuration to provision resources in Azure. Run terraform init to initialize the project and download necessary provider plugins, and then run terraform apply to apply the configuration and provision resources.
8 - Monitor and Manage
Once your Landing Zone resources are deployed, monitor and manage them using Azure tools and services such as Azure Monitor and Azure Security Center. Set up alerts, dashboards, and automation to ensure the ongoing health, performance, and security of your infrastructure.
Note
Deploying Landing Zones using Terraform provides a consistent and repeatable way to provision Azure resources, enabling you to automate the deployment process and manage infrastructure as code. It offers flexibility, scalability, and reliability for deploying and managing complex infrastructure environments in Azure.
6 - Why using Azure Landing Zones!
Azure Landing Zones offer a standardized, accelerated, and secure approach to deploying foundational infrastructure in Microsoft Azure.
They streamline deployment, ensure compliance, and support scalability, resilience, and cost optimization, making them ideal for organizations seeking a reliable and efficient cloud environment.
7 - Additional Considerations
when considering Azure Landing Zones, remember:
- They offer both standardization and customization options, allowing tailored deployments.
- Integration with on-premises systems is seamless, supporting hybrid cloud scenarios.
- Governance tools facilitate effective resource management and compliance monitoring.
- Lifecycles are managed efficiently, with automation streamlining provisioning and updates.
- Azure services seamlessly integrate, enabling innovation and advanced capabilities.
- Continuous improvement is encouraged through monitoring and optimization practices.
- Effective cost management practices ensure cost-effectiveness and ROI optimization.
8 - The ROT Perspective on Azure Landing Zones
In the world of Azure cloud adoption, the ROT perspective – Return on Time – offers a strategic approach to leveraging Azure landing zones for maximum efficiency, security, and scalability.
Azure landing zones provide a structured environment built on best practices, accelerating cloud adoption through pre-defined templates and robust foundations. They prioritize security and governance, enforcing policies with Azure Policy and RBAC to mitigate risks and ensure compliance. Additionally, landing zones optimize costs through strategic resource allocation and cost management tools.
From foundational to enterprise levels, Azure landing zones offer flexibility and scalability, aligning with the principles of Infrastructure as Code (IaC) and automation. By embracing the ROT perspective, organizations can efficiently navigate their cloud journey, maximizing return on investment of time and resources in the Azure ecosystem.
Final Thoughts
Azure Landing Zones offer a streamlined path for organizations to build secure and scalable cloud environments on Azure.
They accelerate cloud adoption, enhance security, optimize costs, and ensure compliance. Whether deploying through the Azure Portal, Bicep, or Terraform, the focus is on aligning with organizational needs.
In essence, Azure Landing Zones are the cornerstone for successful cloud migrations, fostering innovation and growth in today’s digital landscape.
FAQs
Q: What is an Azure Landing Zone?
A: An Azure Landing Zone is a pre-defined environment that serves as a foundation for deploying your resources in Microsoft Azure. It follows best practices for security, scalability, governance, and compliance. Think of it as a starting point for building a well-organized and secure cloud environment.
Q: Why use an Azure Landing Zone?
A: Here are some key benefits:
- Standardization: Ensures consistency across your cloud deployments.
- Security: Enforces security policies and controls access.
- Scalability: Easily accommodates growth in your cloud usage.
- Governance: Simplifies resource management and cost control.
- Compliance: Helps meet regulatory requirements.
Q: How does an Azure Landing Zone work?
A: It’s built on a core architecture that uses subscriptions, management groups, networking, and identity services. The architecture is modular, so you can customize it to your specific needs.
Q: How do I deploy an Azure Landing Zone?
A: Microsoft offers several deployment options:
- Bicep/ARM templates: Infrastructure as code (IaC) for automated deployments.
- Azure portal: Manual deployment through the Azure interface.
The best option depends on your technical expertise and desired level of control.
FOLLOW US
Technology Partners

